Integrations
Integrations are reusable sets of scripts most commonly to connect to external services or on-device applications. Integrations create a sophisticated user experience to provide end-users with information in real time about, for example, the weather or the latest news.
The sections on this page provide information about the various aspects of Integrations:
Concept
Integrations are reusable sets of scripts, most commonly used to connect to external services and on-device applications.
They allow you to create sophisticated user experiences by smoothly providing end users with information, in real time, about anything from weather forecasts and currency conversions, to the latest news.
The Integration Manager allows teams to collaborate, having tech-savvy developers defining the Integration's scripts and methods in a central place while other users can add the Integration in Flows. This way scripts can be defined once - globally - for the whole solution, allowing the dialogue to seamlessly communicate with external systems and processes via third-party APIs and then be applied throughout the solution by means of Integration nodes in Flows.
Passing information
When using Integrations to connect to external services, they specify the data that should be passed between Teneo and that service. For example, for a weather service, an API key may be required along with the location for which the data conditions should be obtained, the number of days for the forecast and the format in which the data should be received (JSON, XML, CSV). For a contact center or chat handover Integration, information related to live agents and available agents might be relevant in order to answer the end user correctly.
Scripting with Integrations
The execution scripts of the Integration's methods have access to the Integration's Input Parameters and the solutions Global Variables. Scripts can populate their Output Parameters as well as Global Variables.
The scripting language in Teneo is Groovy. Read more about scripting in Teneo here.
Components
Availability setting
When an Integration is available, it can be added to Flows. Integrations that are not available will continue to work in Flows that they have been added to but new usages cannot be created and the unavailable Integration is not visible in new Flows.
Note that in Teneo Studio Web this is done by clicking the Info button with the integration open and disabling/enabling the Integration.
Execution Script
The execution script is the script which is executed when the integration is called by a Flow.
Both the Integration's input parameters and the solution's Global Variables are available inside the script. A method's script can populate its output parameters as well as Global Variables.
Input parameters
The Input parameters allow the method to receive information from a Flow and can be strings, lists, objects, etc. The type depends on the type of the variable that was transferred by the Flow.
Input parameters are optional and their names cannot contain spaces.
Output parameters
The Output parameters allow the method to send information back to a Flow, and just as input parameters, the output parameters can be of type strings, lists, objects, etc.
Output parameters are optional and their names cannot contain spaces.
How To
Integration Manager
Open
- Teneo Studio Desktop
- Teneo Studio Web
To open an existing Integration:
- Go to the Integration manager in the backstage of Teneo Studio (Solution tab > Resources > Integration).
- Select the Integration to open.
- Click Edit in the right side of the screen.
- The Integration window now opens.
Double-clicking an Integration also opens the Integration window.
There are two options to open an Integration in Teneo Studio Web:
- In the Integrations tile on the Solution dashboard, click on the name of an existing Integration, or
- In the list of Integrations, accessible in the Solution dashboard > Integrations tile, click on the header or the right-pointing arrow, and then click on the name of the Integration.
Create
- Teneo Studio Desktop
- Teneo Studio Web
To add an integration in Teneo Studio Desktop:
- Go to Integration in the backstage of Teneo Studio (Solution tab > Resources > Integration).
- Click Add next to the text filter.
- In the Integration window, give the Integration a Name and optionally add a Description.
- Click Change image... to add a customized image to the Integration; any image added is used throughout Studio to represent the Integration. The Open file window opens; browse to the desired image and click Open.
- Toggle the Availability option to the left to make the Integration available in Flows.
- Click the back-arrow in the top left corner.
- Now, enter the Method's Name and optionally add a Description.
- Add the Execution Script.
- Add Inputs and Outputs parameters in the right-side panel by clicking Add. Give each Inputs/Outputs parameter a Name and Description.
- Remember to click Save in the top ribbon.
The expected size of a large icon is 32x32 pixels and 16x16 pixels for small icons; Studio automatically resizes bigger images.
To create a new Integration:
- First, either:
- Click the Create button directly in the Integration tile (upper, right corner) on the Solution dashboard, or
- In the Integrations list, click on Create New Integration.

- The Create New Integration opens. Write the Name and optionally a description.
- Then, click Create.
- The new Integration is opened. Now add the Name of the Method (Default Method field) and write the execution script in the Script editor.
- In the right side add any needed Inputs and Outputs parameters. Give each Inputs/Outputs parameter a Name and optionally a Description.
- Remember to click Save in the top ribbon.
Save
- Teneo Studio Desktop
- Teneo Studio Web
To save an Integration with a comment:
- Click Save in the top ribbon of the Integration.
- In the dialogue box (optionally) write a comment.
- Click Continue.
To save directly and bypass the comment, either:
- Press the Alt key while clicking the Save button.
- Expand the dropdown menu under the Save button and click on the Save without Comment button.
To save an integration:
- Click Save in the top right corner of the window.
- Optionally, add a comment.
- Click Save to confirm the save action or Cancel to abort the save.
A successful save is confirmed with a "Document saved successfully!" message. Close this message by clicking elsewhere in the browser window.
Close
- Teneo Studio Desktop
- Teneo Studio Web
To close an Integration, either:
- Click the X in the top right corner of the Integration window,
- Click the Close button available in the top ribbon, or
- In the Integration's backstage, click Close in the left-side menu.
If there are unsaved changes Teneo Studio will prompt the user to Save Changes or Discard Changes.
To close an Integration in Teneo Studio Web:
- First, remember to Save if any changes were performed in the Integration to preserve these; Teneo Studio will prompt the user to save if unsaved changes are detected.
- Next, simply navigate back by using the back arrow of the browser or by clicking a location in the folder path available in the top ribbon.
Delete
- Teneo Studio Desktop
- Teneo Studio Web
To delete an Integration:
- In the backstage of Teneo Studio (Solutions tab > Resources > Integration), select the Integration(s) to delete.
- Click Delete in the top right side of the list.
- Teneo Studio prompts the user to confirm the deletion of the selected Integration(s).
- Click Yes to continue.
- When the Deletion completed message is displayed, click OK.
If an Integration is deleted by mistake, it can be restored from the Recycle Bin.
To delete an Integration in Teneo Studio Web:
- Navigate to the list of Integrations (Solution dashboard > Integrations tile > right-pointing arrow).
- Hovering over the Integration an icon of a recycle bin appears in the right side of the browser window. Click on it.
- The user will be prompt to confirm the deletion of the Integration.
- Click Delete to perform usage check before deletion.
- Check Do not check usage and click Delete to delete without performing a usage check.
- Click Cancel to abort the deletion.
Read more about deletion and usage check here.
Note that deletion of an Integration currently cannot be undone in Teneo Studio Web. For this action please refer to the Recycle Bin available in Teneo Studio Desktop.
Filter
- Teneo Studio Desktop
- Teneo Studio Web
A text filter is available at the top of the list of Integrations. To filter on the available integrations, simply write the desired letter combination to start filtering on the list.
A text filter is available in the top ribbon of Teneo Studio Web. This filter allows you to filter on the displayed list of documents; simply write the desired letter combination to start filtering on the list.
The filter works on the following columns: Name, Description, and Author.
Clicking the column headers allows you to sort the list of documents alphabetically when clicking the Name, Description or Author headers. Click Updated to sort by the date/time the documents were updated or created.
Usage search
This section currently only applies to Teneo Studio Desktop.
To find out where an Integration is used in a solution:
- Go to the Integration manager in the backstage of Teneo Studio (Solutions tab > Resources > Integration).
- Select the Integration you want to search for.
- Click Search in the ribbon in the right side of the view.
- The Search results in the frontstage of Teneo Studio are automatically displayed.
Integration nodes
Add Integration node
- Teneo Studio Desktop
- Teneo Studio Web
With the Flow open, add an Integration node by following these steps:
-
Click the Plus icon and, depending on the icon's location in the Flow graph and the desired behavior, select one of the following options:
-
Continue With > an Integration to query or control another system > select the name of the wanted Integration. This adds an Integration node to the existing path.
-
Split Path > to an Integration to query or control another system > select the name of the wanted Integration. This adds an Integration node to a new path.
-
-
Alternatively, select the node in the Flow editor after which the new node should be added, and click the name of the Integration* in the Add Node section of the top ribbon. * The name of the Integration depends on the name given in the Integration manager.
-
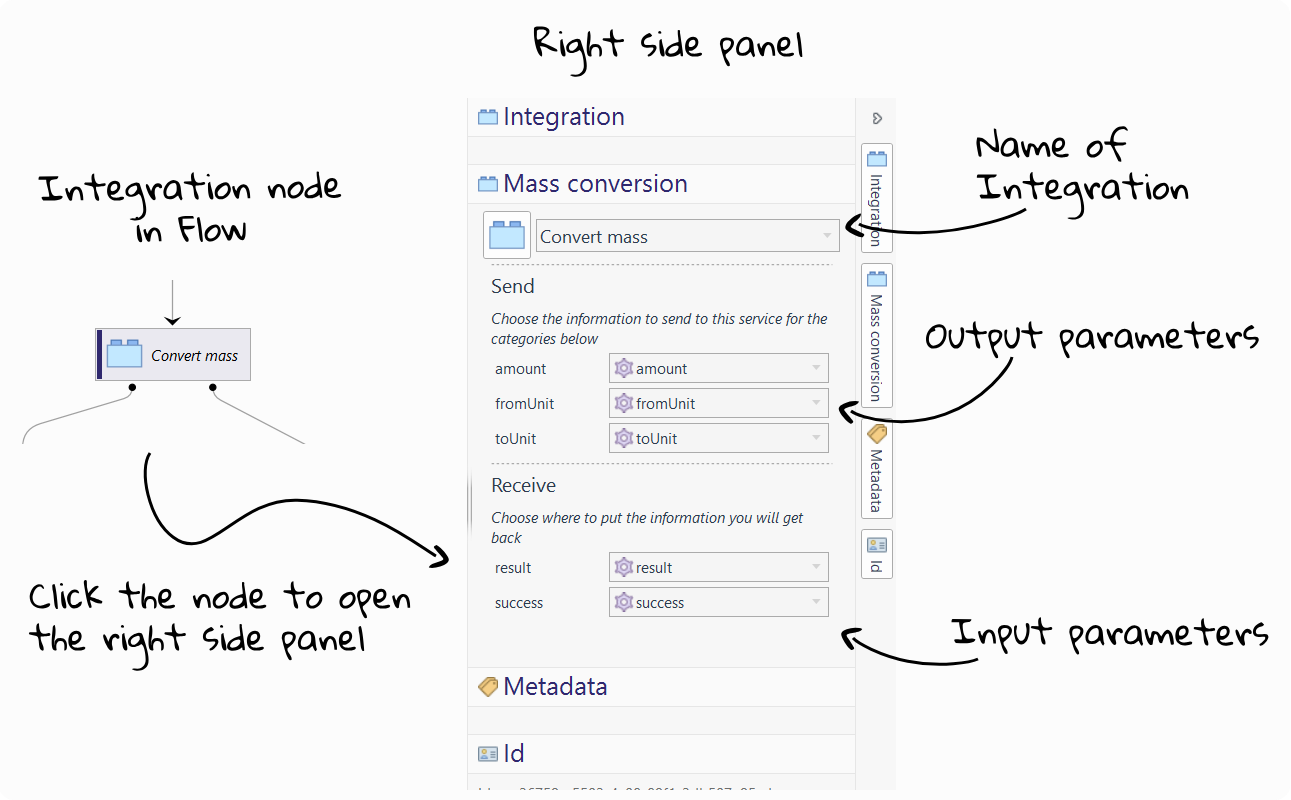
The Integration panel opens in the right side of the Flow window, optionally add a Name and a Description.
-
Configure the Send and Receive parameters.
-
Remember to Save the Flow to preserve the changes.
With the Flow open, follow the below steps to add a call to an Integration:
- Click the Plus icon, and depending on the icon's location in the Flow graph and the desired behavior, select one of the following options:
- Continue With > an Integration to query or control another system > select the name of the wanted Integration.
- Split Path > to an Integration to query or control another system > select the name of the wanted Integration.
- Lastly, remember to Save the Flow to preserve the changes.
* The name of the Integration depends on the name given in the Integration manager.
Edit Integration node
- Teneo Studio Desktop
- Teneo Studio Web
With the Flow open, follow these steps to edit the Integration node:
- In the Flow editor, select the Integration node to open the Integration panel on the right side of the Flow window.
- Optionally, add a Name and a Description.
- Configure the Send and Receive parameters.
- Optionally, Add metadata definitions to the Integration node.
- Remember to Save the Flow to preserve the changes.
With the Flow open, follow these steps to edit the Integration:
- In the Integration node, click Add name to give the node a name.
- To edit the Integration, simply click the value to update and select a new value from the menu.
- Click add variable mapping to configure any in/out parameters.
- Remember to Save the Flow to preserve the changes.
Delete Integration node
- Teneo Studio Desktop
- Teneo Studio Web
In the open Flow, follow the below steps to delete an Integration node:
- Select the Integration node in the Flow editor.
- In the top ribbon, click Delete.
- Remember to Save the Flow to preserve the changes.
In the open Flow, follow the below steps to delete a Call Integration:
- Locate the Call Integration node in the Flow graph.
- Click the Recycle Bin in the sidebar.
- Remember to Save the Flow to preserve the changes.
UI
Integration Manager View
- Teneo Studio Desktop
- Teneo Studio Web
The Integration Manager is available in the backstage of Teneo Studio:
- Solution tab > Resources > Integration
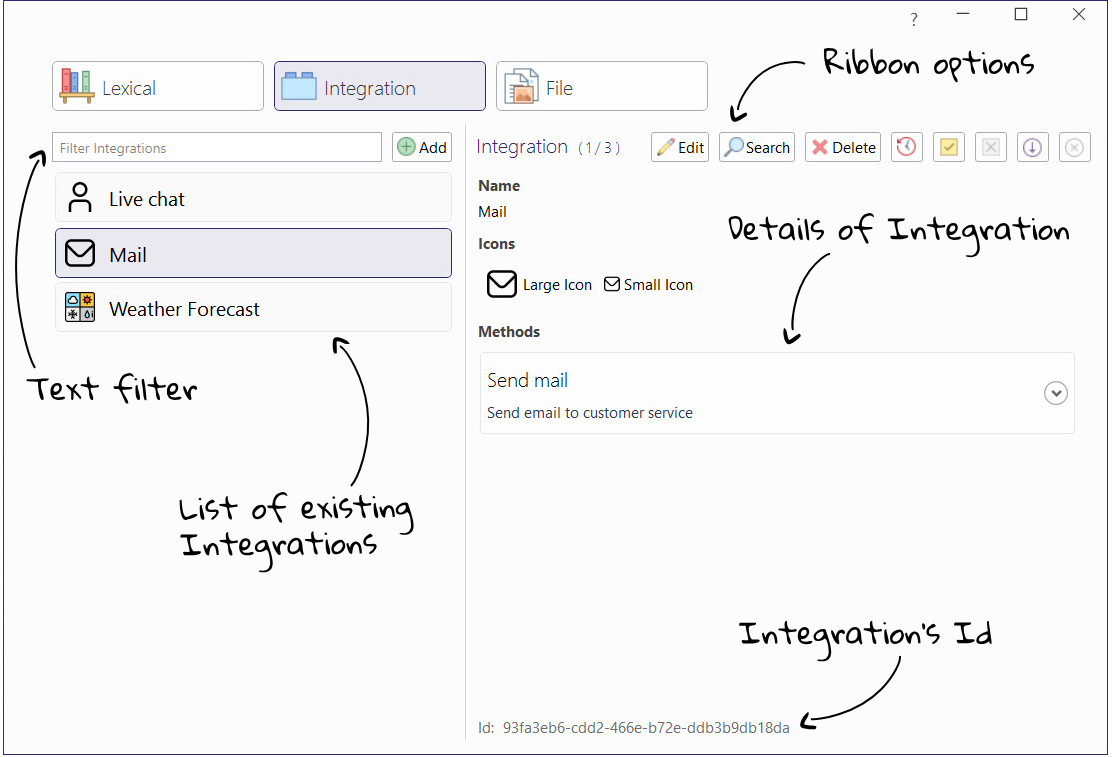
In this view, the user will find:
- Left side:
- Text filter and Add button
- List of existing Integrations
- Right side:
- Ribbon options allowing the user to Edit, Search, view History, set/unset Stable version, include/exclude in Branching
- Details of the selected Integration providing a read-only summary
- The Integration's ID
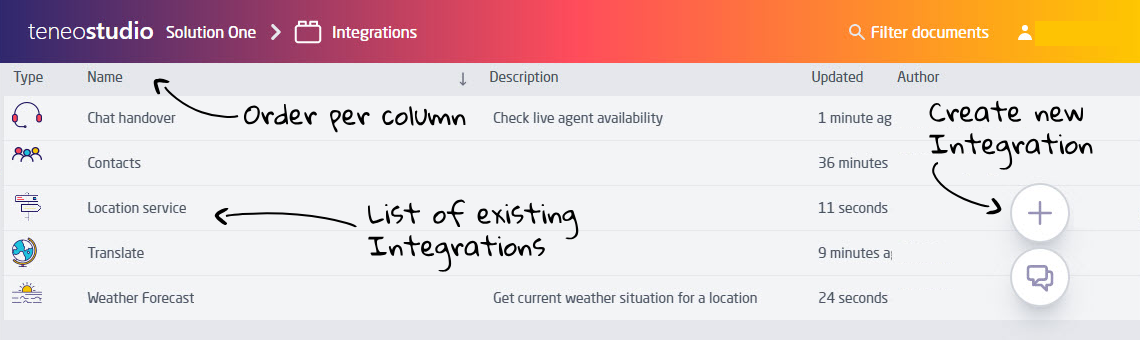
The Integrations are available on the Solution dashboard in the Integrations tile. Clicking the tile header or the right-pointing arrow takes the user to the list of Integrations. Clicking the name of an existing Integration opens the Integration window.
| Element | Comment |
|---|---|
| List of existing Integrations | This area displays a list of any existing Integrations in the solution. |
| Order per column | Order the list per column header. |
| Create new Integration | Click the Plus icon to create a new Integration. |
| Filter documents | The text filter allows to filter Integrations, especially useful when the list is long. |
Integration Manager Window
- Teneo Studio Desktop
- Teneo Studio Web
The Integration window is accessed by either adding a new Integration or by editing an existing Integration.
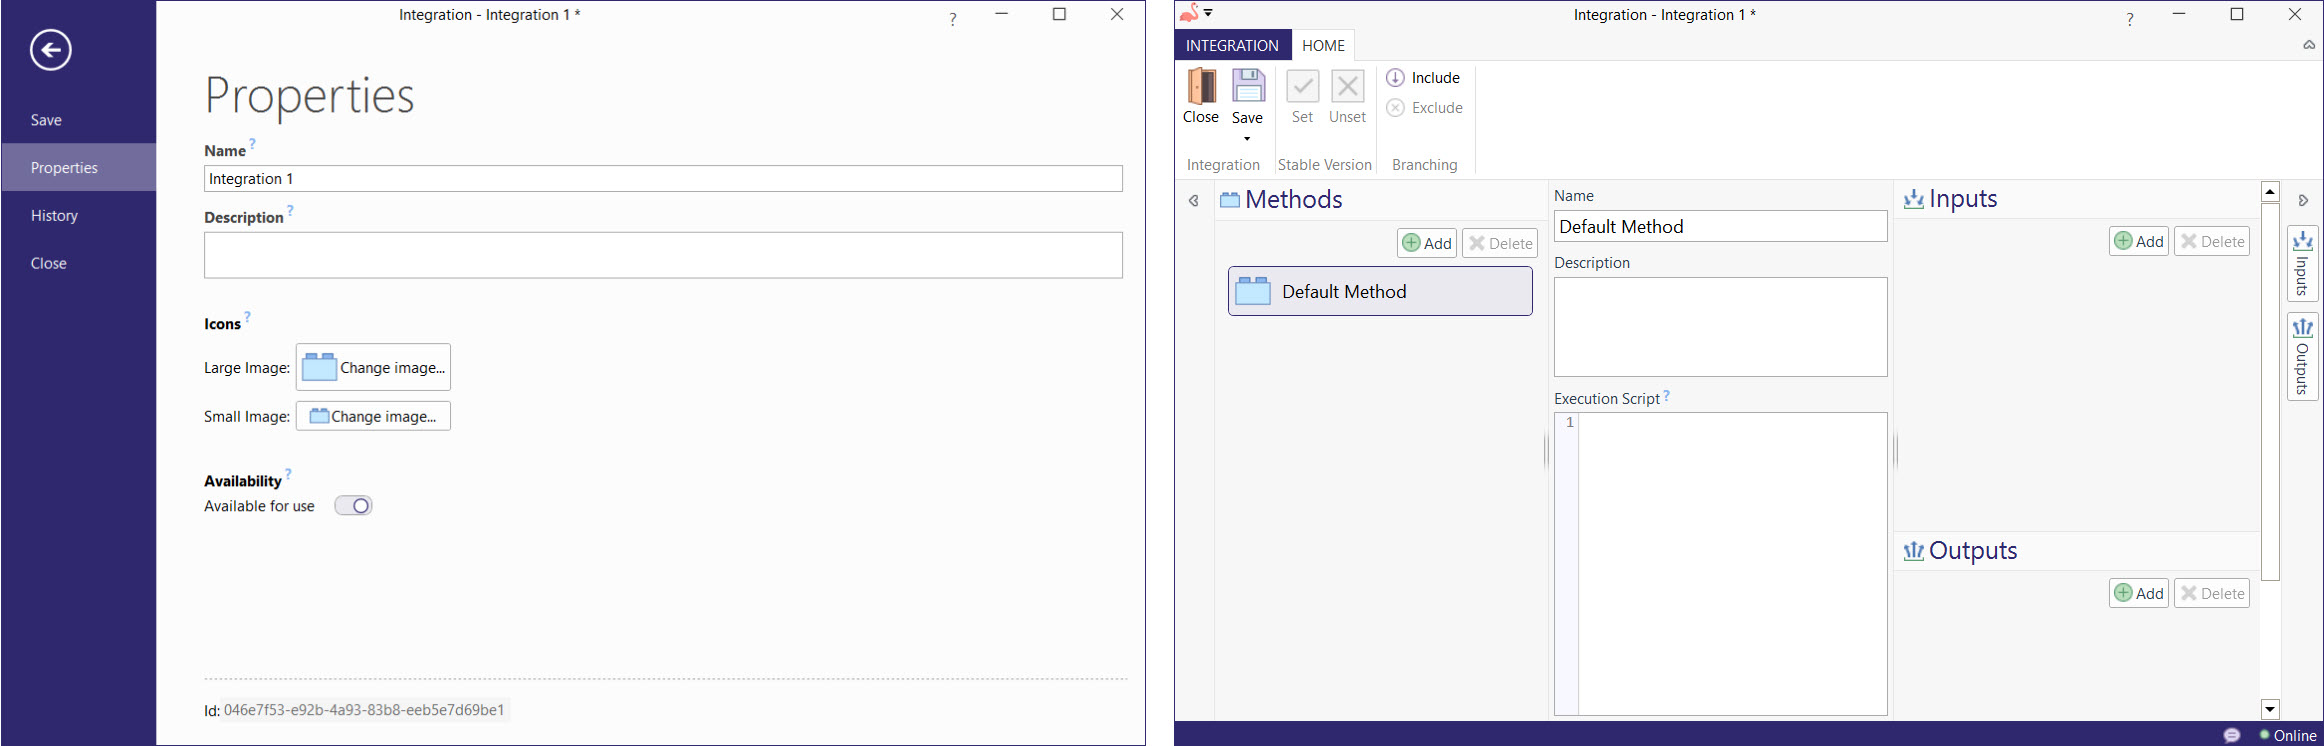
The Integration window has two tabs:
- Integration tab providing access to the Properties and History
- Home tab with
- Top ribbon
- Methods panel (left side)
- Method definition including Name, Description, and [Execution script] (in the middle)
- Inputs and Outputs parameters (right-side panel)
Integration tab
The backstage of an Integration (Integration tab in the top of the Integration's window) contains the following menu and editing options.
| Integration tab | Comment | More information |
|---|---|---|
| Save | Save the Integration in the current state. | Save |
| Properties | Allows the user to edit the name and description; change the image which represent the integration and change the availability for use setting. | |
| History | Lists the history and versions created each time the Integration is saved, comments added at save are displayed here. Open a previous version by clicking the version number. Restore a previous version by opening the specified version and clicking Restore in the top ribbon. | Version flag |
| Close | Close the Integration window. | Close |
Home tab: top ribbon
The Integration's top ribbon provides the following buttons.
| Home tab | Button | Comment | More information |
|---|---|---|---|
| Integration | Close | Close the Integration window. | Close |
| Save | Save the Integration in the current state; clicking the lower part of the button allows the user to save the Flow with or without a comment. | Save | |
| Stable Version | Set/Unset | Set or unset the current version of the Integration as stable. | Version flag |
| Branching | Include/Exclude | Include or Exclude the Integration from branching when working in a Localization setup. | Localization setup |
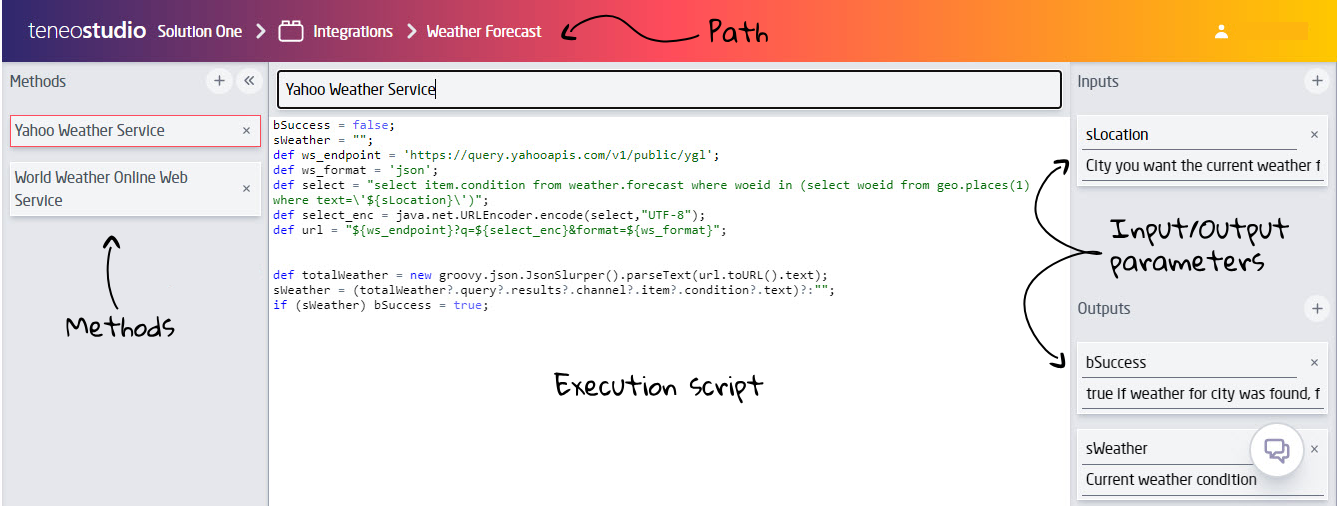
The Integration window is accessed from the list of Integrations by either creating a new Integration or by clicking any existing Integration; it is also possible to open an existing Integration from the Solution dashboard by clicking the name of the Integration in the Integrations tile.
| Component | Comment |
|---|---|
| Path | The solution path allows for easy return to the list of Integrations or the Solution dashboard. |
| Methods | The Methods panel is available in the left side of the window. |
| Name and Execution Script | The editor in the middle of the view contains the name of the select Method and its execution script. |
| Input Parameters | This section in the right side of the view allows you to define Input Parameters. |
| Output Parameters | The Output Parameters in the right side of the view allows you to define Output Parameters. |
Integration node
- Teneo Studio Desktop
- Teneo Studio Web
The following options are available in the Flow when working with Integrations:
The following options are available in the Flow when working with Integrations:
Practical Examples
Implementing an Integration
Let's take a look at a simple example of how an Integration could be used in a solution. For more complex examples in bigger solutions, see Teneo x Generative AI and the Contact Center Connector Framework.
In this example, we will create a Flow that uses an Integration to convert units of mass:
User: 2 kgs to lbs
Bot: A mass of 2 kilograms is equivalent to 4.41 pounds.
Create the Integration
- Teneo Studio Desktop
- Teneo Studio Web
- Navigate to the solution backstage and click on Resources followed by Integration.
- Click on Add.
- Give the new Integration a name like
Mass conversionand click on the back arrow to edit it. Optionally, give the default method a different name as well. - In the Inputs section, click on Add three times to add three input variables.
- Name the new input variables
amount,fromUnit, andtoUnit. - In the Outputs section, click on Add twice to add two output variables.
- Name the new output variables
resultandsuccess. - In the Execution script, paste in the following script:
def convertMass = [ ounces: [ pounds:'1/16', stone: '1/224', grams:'28.35', kilograms:'1/35.274'], pounds: [ ounces:'16', stone: '1/14', grams:'453.592', kilograms:'1/2.205' ], stone: [ ounce:'224', pounds:'14', grams:'6350.293', kilograms:'6.35' ], grams: [ ounces:'1/28.35', pounds:'1/453.592', stone: '1/6350.293', kilograms:'1/1000' ], kilograms: [ ounces:'35.274', pounds:'2.205', stones: '1/6.35', grams:'1000']]

def multiplier

if (fromUnit==toUnit)
{
    success = false
}
else
{

    try {
          def cell = convertMass.get(fromUnit).get(toUnit)
	   if (cell.startsWith("1/"))
             { multiplier = 1.0 / cell.substring(2).toDouble()}
          else
             { multiplier = cell.toDouble()}

          result = amount * multiplier;
     }
     catch (error) { success = false }
}

import java.text.DecimalFormat;
if (result >= 0.01)
{
   DecimalFormat df2 = new DecimalFormat(".00");
   result = df2.format(result);
} - Save the Integration.
- Navigate to the Integrations tile in the main solution window and click the plus sign to add a new Integration.
- Give the new Integration a name like
Mass conversionand, optionally, give it a description as well. Click on Create. - Optionally, above the script window, give the default method a different name.
- In the Inputs section on the right, click on the plus sign three times to add three input variables. Optionally, give them descriptions.
- Name the new input variables
amount,fromUnit, andtoUnit. - In the Outputs section on the right, click on the plus sign twice to add two output variables. Optionally, give them descriptions.
- Name the new output variables
resultandsuccess. - In the Execution script, paste in the following script:
def convertMass = [ ounces: [ pounds:'1/16', stone: '1/224', grams:'28.35', kilograms:'1/35.274'], pounds: [ ounces:'16', stone: '1/14', grams:'453.592', kilograms:'1/2.205' ], stone: [ ounce:'224', pounds:'14', grams:'6350.293', kilograms:'6.35' ], grams: [ ounces:'1/28.35', pounds:'1/453.592', stone: '1/6350.293', kilograms:'1/1000' ], kilograms: [ ounces:'35.274', pounds:'2.205', stones: '1/6.35', grams:'1000']]

def multiplier

if (fromUnit==toUnit)
{
    success = false
}
else
{

    try {
          def cell = convertMass.get(fromUnit).get(toUnit)
	   if (cell.startsWith("1/"))
             { multiplier = 1.0 / cell.substring(2).toDouble()}
          else
             { multiplier = cell.toDouble()}

          result = amount * multiplier;
     }
     catch (error) { success = false }
}

import java.text.DecimalFormat;
if (result >= 0.01)
{
   DecimalFormat df2 = new DecimalFormat(".00");
   result = df2.format(result);
} - In the top ribbon, click Save to preserve the changes in the Integration.
Create the Flow
Now let's create a Flow that uses the Integration we just created.
- Teneo Studio Desktop
- Teneo Studio Web
- Add a Flow and give it a name like
Convert mass units. - Name the trigger
Convert mass units. - Add a TLML Syntax Match to the trigger and paste in the following:
(%CONVERT.VB.LEX/%CALCULATE.VB.SYN/%CHANGE.NN.SYN/%HOW_MANY_MUCH.PHR)
&^
%UNITS.ENTITY
/
%UNITS.ENTITY - Add a Listener After Match and add the following to the TLML Syntax field; you can leave the execution script empty, as the TLML includes a propagation script that carries out the action we are after, namely extracting the relevant values from the user input:
== Get value and unit, as one token ==
(
== Get unit to convert to ==
(%UNITS.ENTITY^{toUnit=lob.unit;}):O
)

/

== Get value and associated unit to convert from ==
((
(((%A.FW.LEX/%ONE.FW.LEX)^{amount=1.0}):O/
((%HALF.NN.LEX>>(%A.FW.LEX):O)^{amount=0.5}):O
) /
(%NUMBER.ANNOT^{amount = lob.TLR_nNumericValue})
>>%UNITS.ENTITY^{fromUnit=lob.unit}
)
&^
== Get unit to convert to ==
(%UNITS.ENTITY^{toUnit=lob.unit;})
) - Save the Flow.
- In the main solution window, navigate to the Flows tile and add a new Flow a with a name like
Convert mass units. Optionally, give it a description. Leave the variables section empty for now. Click on Create. - Name the Intent node
Convert mass units. - Click the plus sign below the Intent node to add a Match. Select when a TLML Syntax rule matches the input and paste in the following:
(%CONVERT.VB.LEX/%CALCULATE.VB.SYN/%CHANGE.NN.SYN/%HOW_MANY_MUCH.PHR)
&^
%UNITS.ENTITY
/
%UNITS.ENTITY - Click the plus sign below the Intent node to add an After Match. Select execute a script when the input matches an additional TLML Syntax rule and add the following to the TLML Syntax field; you can leave the execution script empty, as the TLML includes a propagation script that carries out the action we are after, namely extracting the relevant values from the user input:
== Get value and unit, as one token ==
(
== Get unit to convert to ==
(%UNITS.ENTITY^{toUnit=lob.unit;}):O
)

/

== Get value and associated unit to convert from ==
((
(((%A.FW.LEX/%ONE.FW.LEX)^{amount=1.0}):O/
((%HALF.NN.LEX>>(%A.FW.LEX):O)^{amount=0.5}):O
) /
(%NUMBER.ANNOT^{amount = lob.TLR_nNumericValue})
>>%UNITS.ENTITY^{fromUnit=lob.unit}
)
&^
== Get unit to convert to ==
(%UNITS.ENTITY^{toUnit=lob.unit;})
) - Save the Flow.
Expand the Flow
We have now created the Flow and populated the trigger; let's finish adding the remaining parts of the Flow.
- Teneo Studio Desktop
- Teneo Studio Web
- Name the output node
Get unit and amount to convert fromand give it the answer textPlease enter the amount and unit you wish to convert from. - Click on the Plus icon below the output node and select Continue With followed by a Transaction.
- Name the new output node
Get unit to convert toand give it the answer textWhat did you want to convert ${fromUnit} to?. - Select the transition between the two output nodes and name it
Detect from unit and amount. - Add a TLML Syntax Match to the transition and paste in
%NUMBER.ANNOT>>%UNITS.ENTITY. - Add a Listener After Match to the transition and paste in
== Get value and associated unit to convert from ==
(
(((%A.FW.LEX/%ONE.FW.LEX)^{amount=1.0}):O/
((%HALF.NN.LEX>>(%A.FW.LEX):O)^{amount=0.5}):O/
(%NUMBER.ANNOT^{amount = lob.TLR_nNumericValue})
)
>>%UNITS.ENTITY^{fromUnit=lob.unit;}
)
&^
== Get unit to convert to ==
(%UNITS.ENTITY^{toUnit=lob.unit;}):O

)

/


(
== Get unit to convert to ==
(%UNITS.ENTITY^{toUnit=lob.unit; toUnitPlural=lob.unitPlural;conversionTypeDestination=lob.type}):O - Below the last output node, click on the Plus icon and select Continue with and a Transaction.
- Select the transition that was created and name it
Detect target unit. - Add a TLML Syntax Match to the transition and paste in
(%UNITS.ENTITY^{toUnit=lob.unit;}). - Add a Listener After Match to the transition and paste in
( (("-")^{negative=true}):O>>%NUMBER.ANNOT^{amount = lob.TLR_nNumericValue})
>>%UNITS.ENTITY^{toUnit=fromUnit; fromUnit=lob.unit;}
- Name the output node
Get unit and amount to convert fromand give it the answer textPlease enter the amount and unit you wish to convert from. - Click on the Plus icon below the output node and select Continue With followed by a transaction to recognise Intent and give a response.
- Name the new output node
Get unit to convert toand give it the answer textWhat did you want to convert ${fromUnit} to?. - Give the Intent node the name
Detect from unit and amount. - Click the Plus icon between the two output nodes to add a Match. Select when a TLML Syntax rule matches the input and paste in
%NUMBER.ANNOT>>%UNITS.ENTITY. - Click the same Plus icon to add an After Match. Select execute a script when the input matches an additional TLML Syntax rule and paste in:
== Get value and associated unit to convert from ==
(
(((%A.FW.LEX/%ONE.FW.LEX)^{amount=1.0}):O/
((%HALF.NN.LEX>>(%A.FW.LEX):O)^{amount=0.5}):O/
(%NUMBER.ANNOT^{amount = lob.TLR_nNumericValue})
)
>>%UNITS.ENTITY^{fromUnit=lob.unit;}
)
&^
== Get unit to convert to ==
(%UNITS.ENTITY^{toUnit=lob.unit;}):O

)

/


(
== Get unit to convert to ==
(%UNITS.ENTITY^{toUnit=lob.unit; toUnitPlural=lob.unitPlural;conversionTypeDestination=lob.type}):O
- Below the last output node, click on the Plus icon and select Continue With followed by a transaction to recognise Intent and give a response.
- Name the Intent node that was created
Detect target unit. - Click the Plus icon between the two output nodes to add a Match. Select when a TLML Syntax rule matches the input and paste in
(%UNITS.ENTITY^{toUnit=lob.unit;}). - Click the same Plus icon to add an After Match. Select execute a script when the input matches an additional TLML Syntax rule and paste in:
( (("-")^{negative=true}):O>>%NUMBER.ANNOT^{amount = lob.TLR_nNumericValue})
>>%UNITS.ENTITY^{toUnit=fromUnit; fromUnit=lob.unit;}
Link to the Integration
Now let's use the Integration method within our Flow.
- Teneo Studio Desktop
- Teneo Studio Web
- Beneath the
Detect target unittransition, click on the Plus icon and select Continue With followed by Integration and the name of the Integration method. - As you can see in the Integration configuration panel, we can choose to send and/or receive information from the Integration method. To do this, let's add some Flow variables:
- On the left-hand side of the window, in the Flow section, click on Variables.
- Click on Add and name the variable
amount. Give it an initial value of1.0. - Do the same for the following variables:
| Variable name | Initial value |
|---|---|
fromUnit | "" |
toUnit | "" |
result | 0.0 |
success | false |
- Now head back to the main view of the Flow and complete the steps:
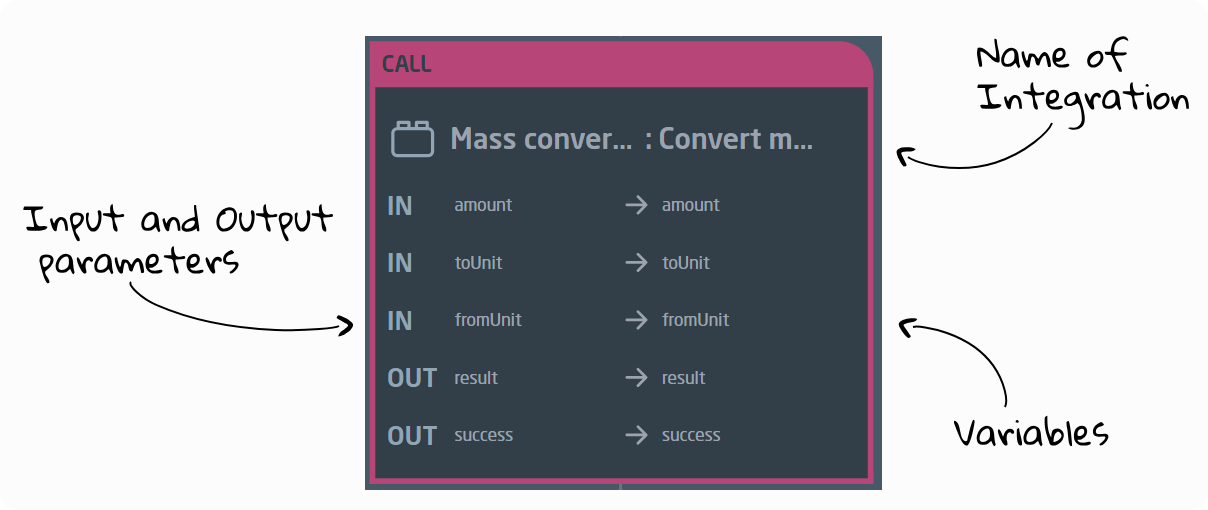
- Click on the Integration node again and select
amount,fromUnit, andtoUnitin output parameters, andresultandsuccessin input parameters.
- Beneath the
Detect target unitIntent node, click on the Plus icon and select Continue With followed by an Integration to query or control another system and the name of the Integration method. - We can choose to send and/or receive information from the Integration method. To do this, let's add some Flow variables:
- Within the Flow, on the left-hand side of the window, click on Variables.
- Click on Add and name the variable
amount. Give it an initial value of1.0. - Do the same for the following variables:
| Variable name | Initial value |
|---|---|
fromUnit | "" |
toUnit | "" |
result | 0.0 |
success | false |
- Click on the Integration node again and select
amount,fromUnit, andtoUnitin output parameters, andresultandsuccessin input parameters.
Finish the Flow
- Teneo Studio Desktop
- Teneo Studio Web
Let's add a path for if there's an error in the calculation:
- Right under the Integration node, click on the Plus icon and select Split Path, followed by transaction element and Output.
- Click on the Plus icon above the left output node and add a Flow Variable Match. In the configuration panel that opens, select the Flow variable success and set its value to
true. - Select the left-hand output node, name it
Show result of mass conversion, and paste in the answer textA mass of ${amount} ${fromUnit} is equivalent to ${result} ${toUnit}. - Select the right-hand output node and set both its name and answer text to
Sorry, something went wrong.
Finally, let's add some Skip conditions to a few of the nodes to make the conversation a bit more natural:
- In the 'Get unit and amount to convert from' output node, add a skip condition and paste in
fromUnit. In the dropdown, select the name of the transition to skip to, in this case 'Detect from unit and amount'. - In the 'Get unit to convert to' output node, add a skip condition and paste in
toUnit. In the dropdown, select the name of the transition to skip to, in this case 'Detect target unit'.
Let's add a path for if there's an error in the calculation:
- Right under the Integration node, click on the Plus icon and select Split Path, followed by transaction element and queue output to be given to the end user.
- Click on the Plus icon above the left output node and add a Flow Variable Match. Select the Flow variable success and set its value to
true. - Select the left-hand output node, name it
Show result of mass conversion, and paste in the answer textA mass of ${amount} ${fromUnit} is equivalent to ${result} ${toUnit}. - Select the right-hand output node and set both its name and answer text to
Sorry, something went wrong.
Finally, let's define additional rules for when the output should be given to make the conversation a bit more natural:
- Click on the Plus icon above 'Get unit and amount to convert from', followed by 'Continue with' and 'Junction'.
- Click on the Plus icon above 'Get unit and amount to convert from,' followed by 'Match' and 'Flow variable'. A new node will open. In the dropdown menu, select
fromUnitand type" "into the evaluation script. The existing path will now only be executed if the value of thefromUnitvariable is empty. Let's add the path we want the bot to take if the variable has already been assigned a value in the After Match. - Hover over the arrow beneath the junction that does not go to the existing path. You should see a small green dot.
- Click and drag to create a new path from the junction to the
Detect from unit and amountnode.
We will do the same for another node in the Flow:
- Click on the Plus icon above 'Get unit to convert to', followed by 'Continue with' and 'Junction'.
- Click on the Plus icon above 'Get unit to convert to,' followed by 'Match' and 'Flow variable'. A new node will open. In the dropdown menu, select
toUnitand type" "into the evaluation script. The existing path will now only be executed if the value of thetoUnitvariable is empty. Let's add the path we want the bot to take if the variable has already been assigned a value in the After Match. - Hover over the arrow beneath the junction that does not go to the existing path. You should see a small green dot.
- Click and drag to create a new path from the junction to the
Detect target unitnode. - Hit 'Save'.
Try it out
Now your Flow is using your new Integration method to convert mass units. Try it out:
User: 2 kgs to lbs
Bot: A mass of 2 kilograms is equivalent to 4.41 pounds.